


All packed up and loaded down for the DM Chitown Invasion. Panda and I are shooting media for Motor Mavens at round 3 of D1GP USA at Soldier Field… and something like 10-12 other DriftMechaniks are heading to Chicago as well. Hopefully we don’t burn the city down this time. No promises though.
Panda and I spent the last couple days putting wrench time in on my Dad’s old Peugeot road bike. There is a good story behind this bike. It has been neglected for many many years. Since I want to get to doing something more active than one sit-up a day… I wanted to resurrect this thing from the depths of the basement. This bike was so much fun to work on. Maybe now I understand the fixed gear craze a bit more… because I really had a ton of fun working on this with Panda.This was how the bike started. It is hard to tell in the photo… but it is hella dirty. Someone sprayed it with a fire extingisher… then it molded over. Tires are rotted out, brakes didn’t work, etc

Here you can see the fire extinguisher grossness… and some insulation. The grip was all sorts of rotted/torn away

Dirt detail.

The seat was falling apart

Simplex gear shift paddles… and… some mold

More mold, and cool emblems


My Dad got this bike when I was 1 year old

First night of disassembly and cleaning. Panda was shining up the chrome on the wheels. I was working on cleaning and polishing the frame.


Got some new bits from Cycleworks
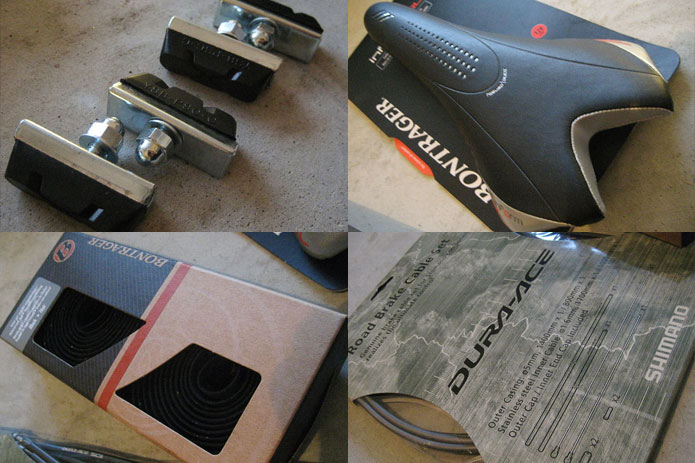
Panda working on the brakes

Cycleworks sold me the wrong tyres… so Panda is letting me use an extra pair he had. <3

Panda finished the brakes, we got the wheels all mounted up, and re-gripped the bars… and viola: so fresh and so clean, clean!

We decided to make it a single-speed. I don’t want to go with a fixed gear because I will hurt myself.


MEGAAA THANKS to Panda for all the advice and help. This really was a blast to fix up… even more-so since this bike has family history

Random (and awesome) choke-and-puke en-route to Virginia for the North vs. South event at VIR.
Tom and Tripp from Spitfire hooked me up with a SWEET Flip Mino HD, and told me you could hack it to fit wide angle lenses. After some research, and a quick trip to Home Depot for supplies, the defacing began.

After sanding, fitting, and TONS of gluing… this is what I wound up with:

This hack is not pretty on the outside. Actually… it looks really bad. It scratches the camera body up pretty bad (I was even careful)… then you get glue all over it that discolors the plastic. But I’m all for form over function… so let’s take a look from inside the camera.
Here is a screenshot of my toolbox straight from the camera, without the wide angle lens:

This is the same shot, but with the wide angle lens on the camera:

There is quite a difference with the lens on. I feel like the lens helps the image quality a bit as well… especially with bright light sources. You can get cool light washes that you couldn’t get without the lens. Another big plus… the weight of the lens seems to help with the shaky picture that comes from the Flip straight out of the box.

I picked up some $20 smoked corners off eBay to get a matching set back on the car after my collision with Austin. Pictured here with the OEM corner… these aren’t too much darker – but just about right. I got the strobe lights installed easy… and they look pretty sick on the car!
Still on the hunt to resolve my hydro e-brake/ABS/limp-mode issue in the e46… I took some advice given to me on ZipTied… and found a local shop that had an Autologic. I was told that using Autologic, you can hand program the ABS out of the DME without tripping faults. A quick Google search led me to Munich Motorsport.

They had to download the software from my car, and send it to Autologic UK to have the programming done. Unfortunately for myself… keying out the ABS cannot actually be done without tripping faults and throwing the car into limp-mode. Why is this so damn hard to do? I need a functioning hydraulic e-brake… without freaking out my computer OR aggravating the ABS pumps. UGH.The good news (and the real reason for this post) is… the crew over at Munich Motorsport are SUPER nice, and extremely accommodating. I really have to recommend them to anyone with a BMW or Volvo that needs work done. They really went out of their way to help me… and even though we weren’t successful – Matt had some suggestions on how to disable the ABS without freaking the car into another seizure.

I found this old news clip while digging through some old files. A pretty cool Fox News feature from the Hyperfest event at Summit Point Raceway in West Virginia. My buddy Tony Schulz gets a spotlight, and I’m in the video for a split-second around the 2 minute mark. A pretty cool find from way back. These were fun times for sure.

The revamp of the Slide Style™ site is finally complete, and live online. A lot of work went into this site, and I like it a LOT more than the old version. It looks a lot cleaner, and much more polished. I think the catalog of products looks awesome. I have some more items to get up on the site… but for the most part, she’s full-steam ahead.Take a look, buy something, and support American drifting!
Believe it or not… I actually SKIPPED the Southeast Drift event at Turner Field today for a class. That’s right. I ditched drifting for school. An opportunity came up to take a class in Cinema 4D – which is an animation software that I have been dying to get my feet wet in. Even though I would miss out on an awesome event at Turner, I knew this would be my chance to get acclimated with Cinema 4D.
Darrin Frankovitz, lead trainer at Maxon was instructing the class at MGFest ’09. The class went over the basics of C4D, and the Mograph module. I learned a lot… including that I have A LOTTT to learn.Here is a screenshot of one of the project files I was making. The extruded Helvetica looked too much like elements of the Comcast commercials to pass it up… so Comcastic™ it was.


Equally as overdue as the DriftMechaniks forum upgrade/re-skin, the new dM blog is up and running. We’ve had a ‘coming VERY soon’ page since 2004, and everyone else always seemed to come first… knocking the dM site down on the list of to-do’s. No longer. The whole crew has posting access… so subscribe at your own risk and commence the ‘elite’ mentality that is dM.

After 5 years of the same ol’ phpBB2 look and feel, I’ve upgraded the DriftMechaniks forum to phpBB3, and re-skinned it with a fresher, more updated look. I thought it would be a smooth transition until I found out you can’t embed HTML in phpBB3… which is not good, considering the amount of YouTube and Vimeo embeds we have on the site. I figured out a way to force embed – but now I have to go back through over 800 posts and at HTML bbcode tags before and after all embedded video.


My buddy Will Roegge was in town working with the Tripp and Tom from Spitfire Studios… and the timing couldn’t have worked out better, because the second installment of Southeast Drift’s Triple Threat II was going down at Turner Field while he was here.Will brought out his Letus35 adapter so we could try it out on my newly acquired XL-H1. I had heard a lot of great things about adapting 35mm camera lenses, but never had a chance to mess with it at all. Boy was I in for a surprise.Here you can see ‘Man of Action’ Brady Stribling helping with the merger.


With the adapter, rails, and lens… it adds a significant amount of weight to the camera. By significant, I mean a TON.

Petey says okay… the camera looks hella legit with all of that – but how does the video look?

Let’s take a look at some screen captures. These are straight from the camera – no post whatsoever. rnFor reference… we’ll start with a shot from the XL without the adapter. The focal length seems almost infinite.
 T
T
The focal length is slightly different with the Letus35, don’t you think?


With the flick of the wrist, you can pull focus for an amazing look.


Overall… it gives the digital medium the filmic quality that I’ve been after for years.

Special thanks to Will for turning me onto this bit of equipment. My credit card hates you in advance… because I can’t wait to get ahold of one of these!


